Saturday, 9 April 2011

SunBurn Snippets #4 – Blender to SunBurn basics – Multi-Material mapping

Due to popular request here’s yet another snippet for the Blender to SunBurn series.

Here I cover how to setup materials in Blender for use in the SunBurn Game Engine and it’s editor (this links up the training video for materials and assigning textures on the Synapse site)

The basic instructions are as follows:

  1. Get your model and Unwrap the UV's how you wish, both Main Text UV and the lightmap (using smart project and create lightmap with new channel respectively), remembering this has to be done in "Edit Mode" (if any of this is already done in your model, ignore that part)
  2. Go to the Materials panel and set up the materials you want to use (be careful what you call your materials as they need to be uniquely recognisable)
  3. Next, whilst still in Edit mode, un-select all parts of the model
  4. Change to your specific selection mode (Vertices, Edges or Faces) and select the items you want to assign to a NEW material (by default all entities of a model are mapped to the default model)
  5. Next Select your new material and click on Assign. (this will move the selected items from the default to your new material, they are automatically unassigned from the default)
  6. Repeat this for the rest of you materials
  7. Save file (Important or it doesn't export correctly!)
  8. Export using the exporter of your choice

If you are using multiple models in a scene you can either just have one material per model, or separate the visible portions of the model from the hidden and only texture the visible to save on rendering. (as shown in the video on the Synapse Gaming site)

Right I'm outta here, lots to see and people to do. Wait reverse that!!.

One last thing!!!

I’m now using the latest version of Blender (2.7RC2) now but when I tried opening the “User Settings” screen Blender would crash, lots of troubleshooting later no fix, even reverting to old versions of the 2.5 series did now help.

Eventually found a fix which you should know about and it seems it’s just one of those gotcha’s when using Blender.

Blender needs the AREO theme enabled in Windows 7

Don’t fully know why but using a basic theme (which I did for doing the webcasts) seems to disable some 3D stuff which blender then doesn’t re-enable it for use (or depends on something to be there). The Blender team are now aware and are looking in to it, which will either produce a fix or an update to the documentation.

Just thought I’d let you know Smile

Wednesday, 6 April 2011

SunBurn Snippets #3 - Troubleshooting overly bright models in the editor

Following on again after the last snippet on Light maps, here’s another common issue you can sometimes face, usually with simpler models but also with any model setup incorrectly for lighting.

Some models when imported into blender take on a glowing type effect where they are not casting shadows, all faces or most faces are just bright as if lit from all angles, this is actually not far from the truth.

What the engine needs is a lightmap (Second UV Channel) to be completely UNIQUELY mapped, meaning each and every face must have it’s own area on the lightmap texture channel.

For a cube this is the difference between:

image image
This
A single faces UV texture that would map to all faces
and This
A uniquely mapped UV texture with each face having it’s own area

If you have your UV channel setup like the view on the left, then when SunBurn calculates the lighting for each face of the model it will multiply this data solely on this one area for each face ad for each light.  OVERBURN Winking smile

So simply re-project your UV map in your tool of choice and off you go.


Right that’s the last of the snippets I have for now, if you are having any problems or issue you are facing, then drop in to the SunBurn forums, I'll be keeping an eye in there and do another snippet for troublesome issues with getting models working.

Alternatively, drop a comment here and i’ll see what I can do.

Now it’s time to add a little more Flux to my Generator, gotta get back.

SunBurn Snippets #2 - Troubleshooting Lightmaps

Troubleshooting the disabled LightMap option in the SunBurn Editor

So following on from my last post on how to use Blender to get models into the SunBurn Engine, here’s Snippet number 2.

This video basically walks through how to solve one of the issues I faced when starting out with the SunBurn Game Engine, Lightmaps.

As mentioned in the full video previously, in order to use a Model in the SunBurn engine, especially for Windows Phone XNA Games, you need a second uniquely mapped UV channel, the SunBurn engine then used this to store the Light data generated by the engine for display.

With most models bought off the shelf or even created in your favourite tool, you will most likely find that this is not currently available, so you either have to contact the artists to get this added or use a 3D modelling tool, like Blender to add it.

You could of course hack it in your self into the model file as well, but without a tool you will not know which UV data to place into the second layer, so this process of trial and error could take a lot longer (or you could be fantastic with the FBX file format and just fly through it)

The end result is the same, you need that second channel added to your models in order to enable the “Light Mapping” option in the editor and use the model in your game.

**Note

Blender has limited support for IMPORTING model formats, there is currently I know of no importer for the FBX format (even with Autodesk tools such as 3DS Max or Maya) without using complex conversion tools.  SO when you are getting or buying models for use with SunBurn games, make sure you can have access to a source model format you can edit e.g. Collada, Blend, 3DS, Obj.  Basically check first. (Although there are a variety of add-on scripts available for importing other formats, but no FBX as yet)


All Done, enjoy the video and happy motoring

Right I'm back off to the Batcave using my Phones SatNav to get there, which may take a while… Hot smile

Tuesday, 5 April 2011

Blender to Sunburn – Step by step

Following on from my SunBurn session for the TechDays event in march, I am following up with a few short snippets for how to get started and troubleshooting.

Feel free to add comments to this post for further suggestions in the use of tools as an input to Blender.

if you want to learn more about SunBurn or the SunBurn editor, i suggest you visit their site and even check out the excellent video series about the editor.  Also there is the YouTube channel you can subscribe to for more of the editor tutorial videos.

Anyway enough of this preamble and on with the show, I’ve decided to do this one in two flavours the video here and the write of it below:

SunBurn snippets Video #1–Blender to SunBurn

So the video above shows you all the steps, here’s a bit more.


Requirements for SunBurn

In getting started with any modelling tool when you are using SunBurn you just need to work out what it is you need populated in the model in order to make it work, this also depends on which platforms you intend to deploy on:

  • Windows & XBOX
      • Properly rigged objects
      • Named Materials (useful in editor)
      • UV Mapped textures (or just a base UV map if you are texturing in SunBurn)
      • Animation (if required)
  • Windows Phone
      • Everything for Windows / XBOX – plus
      • Second uniquely mapped UV Channel

I’m not going to cover all the different permutations of these, were just going to keep it basic for this example.

**Update

It’s noted on the latest release of the SunBurn engine that in future we not need a second lightmap channel for models, so for now this second UV channel technique is needed.

It’s not clear however yet if this will be the case for the Phone in the future, time will tell


Getting set-up

So for the basic example (as shown in the video) we are going to take the most basic object (a cube), texture it, UV map it and then export it for use in SunBurn, then to finish off we will import it into the SunBurn editor.

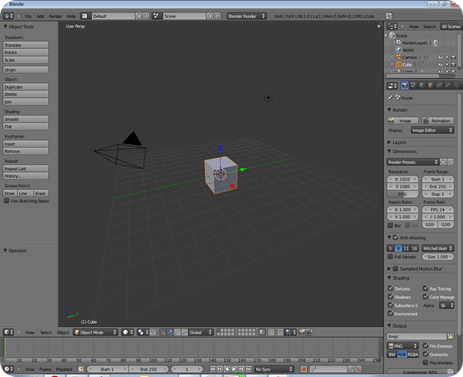
So after starting Blender you should be presented with the default scene:
image

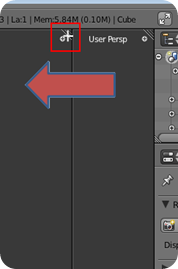
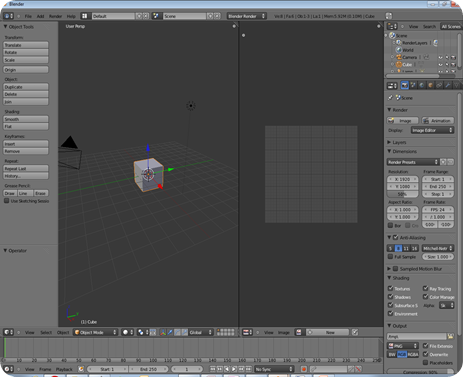
Now to make our lives easier (and take advantage of one of the new features in the new blender) we are going to split our main viewport so we can see both the model and the texture/UV mapping we are going to use.

Simply drag left from the top right hand corner of the main viewport.
This will create a second viewport we can use for the separate view
image
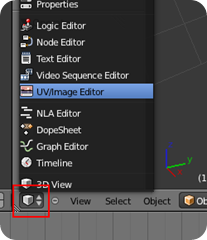
image Next we are going to change the view type to “UV/Image” to show the UV Image editor

Just click on the Selector box in the bottom left hand corner of the new viewport and select the “U/V Image Editor” option

So now you should have a two pane view, model on the left and image area to the right:
image

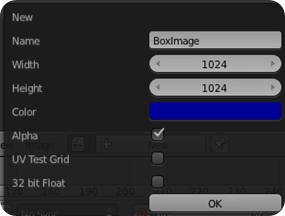
Next we’ll generate the texture you wish to use on our model (as stated before you could simply use an existing texture like a crate design or such), In the UV Image window simply click on the “+ New” button and give it some detail and select a colour, then click “OK”:
image

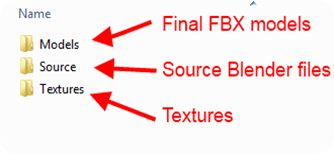
Before we continue, it is recommended to save both the current model and the texture we just created in their respective folders, Model to one folder and the Texture to a separate “Texture” folder under the same structure, thus:
image


Getting to the meaty bit

So now whisking through (beating the eggs as it were, not that I have anything against eggs of course Hot smile), we need to define the UV map of the object and assign a texture to it.

I will point out that I am just creating a basic texture through Blender, you could of course use a more complicated texture from elsewhere or even use several textures mapped around the object.

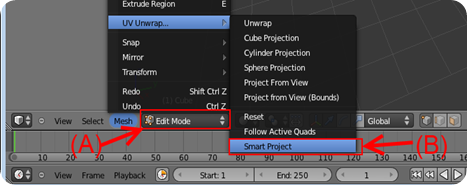
So first switch to “Edit mode” using the selector toward the lower left portion of the screen (A) and then use the “Mesh” menu (if you do not see Mesh it is because you have not selected “Edit mode” to select “UV Unwrap –> Smart Project” (B).
image

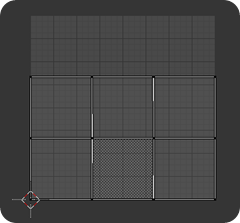
Now you should see a box like map in the UV Editor window like this –>

What you see is a square for each face of the cube.

Try repeating the exercise with the other UV Unwrap modes to see what they do, each affect how a texture would display on an object
image

image

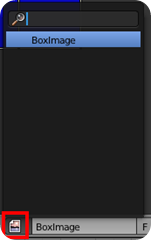
Note that our texture has now disappeared, this is simply because we have created a new UV layer, we just need to state which texture the layer is intending to use. 

Because we selected it earlier, by clicking on the picture icon next to the image name you will see a list of known textures to pick from, just select ours.

If you are using an existing image and skipped the texture creation / selection section earlier, you can just select “Image –> Open” at this point to assign it as well.  Note if your image is a single face, then simply use a different UV Unwrap mode to paint your object properly.  This will not affect the next steps.

That done and you should now see your image with the UV Overlay.  So now we need to take this and assign the texture to the model.

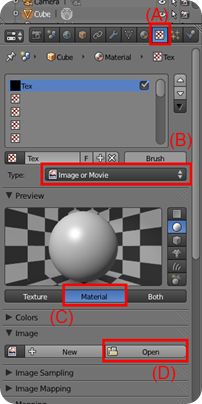
In the properties window, select the “Texture” tab (A)

Select the “Type” as “Image or Movie” (B)

Change the preview type to “Material” (C) (just one of those things that works?)

And then Open up the existing Image you saved/used earlier (D).

Note, would not recommend using the “New” option here as the results usually end up different from what you expect, might be a bug or I’m just using it wrong, but hay ho

image
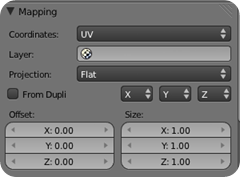
image With that done you also need to change the Mapping type by extending the “Mapping” section lower in the texture properties and changing the “Coordinates” option to UV.
You can experiment with different types to see the effect but this seems to give the best results here.

So now our texture is mapped to our model, next we need to check and change the material properties, mainly so it is represented correctly in SunBurn.

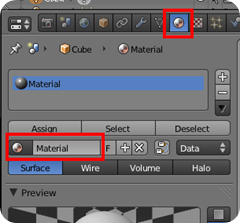
Swap to the “Material” tab in the properties window:
image

Making sure you have the correct material selected (if you have multiple materials) then change the name of the material to something a bit more meaningful and hit “enter”, this is what you will see in the SunBurn Editor should you wish to apply different materials to objects there (you might have a generic Box model and several crate textures for example)

I also find it useful to also click on the “Assign” button here, it just affirms that the selected material is applied to the model.


Now for the important bit

So far we have done everything as normal as you would do if you are just using models for XNA, now we need to enhance our model so that we can use light maps against it in SunBurn.

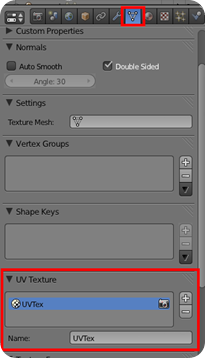
First switch to the “Object Data” tab in the properties window

Here you will see the UV Texture section towards the bottom of the screen.
We already have one UV texture assigned because of the UV mapping we did earlier for the display texture.

Now we need a second texture for our Lightmap.
Just click the “+” icon to the right of the list, give it a more descriptive name like “Lightmap” just so we can identify it.
Then with this new UV map selected repeat the option to Unwrap the model, this time however you do not need to select a separate texture, just leave it un-textured.
image

Now you should have two UV maps for your model, one textured and one not, just click on each to see the effect.

With that done Save everything (just to be sure), once done we just need to export the model.

Now I mention the “XNA FBX Exporter” script in the video, reason being this script is incompatible with SunBurn, it is useful for normal XNA projects (it sets up a load of defaults specific to XNA like bounding volumes and a few other settings used by the content pipeline, it even now comes as default with the latest Blender builds, no need to install it separately) but SunBurn doesn’t like it.  So just use the Normal “Autodesk FBX” exporter to save your model (into the models folder) and you are done.


Where to go from here

I’m not going to detail here how to import a model in to the SunBurn engine, it’s covered in the video for completeness, but you are better heading over to the Official training videos on the SunBurn site, specifically this one if you need to know now.


Done

Right I'm done for now, I am going to follow up with two other snippets, but just as videos this time to show some common troubleshooting tips for issues I found common when learning all this stuff, namely:

    Why is the Lightmap option Disabled in the Editor
    Why is my lighting not working correctly, it’s all white

These took a little while and a few questions in the Forums to solve, which is the best place to go to get help by the way (Just search first!!!)
Ta ta

Comments and queries welcome

Thursday, 22 July 2010

XNA-UK Refresh and exciting new look

Well it has been a while since I blogged here, but rest assured we are very much still alive and active in the XNA and 3D Design space.

One of the major piece of works we have done recently is to move and upgrade the XNA-UK site, One of the main hubs in the XNA game space and the best place to meet likeminded people to make games, share ideas and get help.

One of the other signature pieces of the site it to bring devs / artists and testers / designers together in one place.

Come and check it out here:

http://xna-uk.net/blogs/braindump/archive/2010/07/22/welcome-to-the-all-new-amp-shiny-xna-uk-site.aspx


Check back often for some exciting news coming soon!

Darkside

If you have missed my content, then check out my Dark Genesis blog (in case you missed the move announcement) on XNA-UK.NET

I will be returning to the 3D tutorial series, however Windows Phone 7 has pretty much consumed my life at present.

Monday, 11 January 2010

How cruel the gods can be.

It seems 2010 is going to be a bad start for me as the end of 2009.

In the latter part of 2009, my 3D blog here and my programming blog (http://thegamedevspace.spaces.live.com) were both plagued by a wholly mind crushing work schedule.  No time to breathe and even my 2 games projects ground to a undeniable halt.

Christmas ended up being busy for other reasons but now with the arrival of 2010, my expectations and new schedule of research, dev and tutorials seem doomed with the latest revelations:

Mass Effect 2 (BioWare) - January 26
It arrived a little late, but the PC edition of space RPG Mass Effect improved many elements over its initial Xbox 360 release. This time around, BioWare plans to release the versions alongside each other. The game will import character and decision data over from the original game, so make sure you've got your save files lying around.

BioShock 2 (2K Marin) - February 9
The sequel to 2007's acclaimed BioShock is being developed by a newly-built studio, but its creative leadership contains key figures from the original 2K Boston team, as well as some talented additions. The group has a lot to live up to, but early glimpses (of which there have been relatively few, thankfully) are promising.

You would think these game Companies would be a bit more sympathetic to us game developers, but no.  They keep bringing out these smashing titles just to break us.

Oh well, I'll just have to sort something else out :-(

(Also doesn’t help I picked up Fable 2 / Dragon Ages and Borderlands (which is great harmless fun) over Christmas)

Happy new year to all and hoping I will be out from under this rock soon.

I still intend to finish this 3D series, so worry not.  It will appear, just slower that I had originally would have liked

Friday, 3 July 2009

A bit quiet, but here’s more

Sorry to say but work has taken priority at the moment and drained most of my resources (I’m getting battered to hell with deadlines approaching)

Fear not though as I am still working on the tutorial (I set a goal and I'm keeping to it, just not in a timescale I might of liked) although after 1 sick week I did manage to revamp a little XNA work updating an old Camera Examples project that shows how cameras work and how to manipulate them.  It’s been updated to XNA 3.1 and had some fluff added around the edges, a monster input manager and customisable control system, I also integrated the networked GSM sample from the creators site with some additions from my colleague Charles from Dark Omen Games.  Not quiet finished yet as I want to write the settings configuration pages a bit better before re-releasing it.  The Existing XNA 3 project can still be found here on Box.Net (link to follow, thank you firewall) or on my Codeplex page (if your curious about it)

Anyway, that’s not why I was phoning.

As a 3D modelling blog, i have to mention a guy of great interest who has set a very daunting challenge.

100 models in 100 days

Now that is a lofty goal but one that “Josh Mooney” is really up for and is progressing very well with, so far he has gone through about 4 categories:

  • RPG style set
  • A few spaceship models (although he admits these are not up to much)
  • An Entire 3D chess set (which is absolutely fantastic)
  • A 3D RTS set

Work continues and you can follow his progress here.  Keep up the fantastic work Josh.


The Chess set in it’s finished presentation

Wednesday, 10 June 2009

Support Ziggyware

I’m currently a bit out of action at the mo which is hampering my efforts to get the next tutorial up but I’m doing what I can to finalise it. I’m desperate to get past the initial mud of this course and get on to the fun stuff, but softly softly.

It seems even my good friend Charles from Dark Omen games has been plundering on without my help now and created some interesting Blender results with his own hands and imagination, check it out here on his blog, there is another video on the same concept which just freaks me out.

Anyway, back to the main thread.

Ziggyware.com is one of the best sites for XNA resources and has been around since the beginning. It including Articles, Tutorials, News and even an Image of The Day section where you can look at what other people are doing.

But that’s not all. One of the things that sets Ziggyware apart from others is that about two or three times each year, it holds a “XNA Articles Competition”. The result of this competition usually takes form in lots of top-quality tutorials and articles about stuff you can do with XNA. Ziggyware wants to repay the talented people that make these tutorials, so he gives them prizes. Because of this, from time to time, there’s a call for donations, and now is such a time.

If you like to use the articles on Ziggyware, and if you want to help the site grow, prosper and continue to provide a constant stream of good XNA articles, you now have the chance to do so, by going on Ziggy’s site, and seeing how you can help.

ziggyware[1]

Thursday, 4 June 2009

Nebulon In Play Test

Not quiet part of the 3D tutorial, but I got a shout it here.

boxart

So,as I have mentioned before, I am part of a group called Dark Omen Games, and we have finally got around to getting a Creators Club Premium membership so we can start to release our games on the Xbox Live Creators Games.

As my post title suggests, the first game we are putting up is Nebulon, the brain child of Dave Bonner.

Nebulon is a 2D top down shooter, you fly your ship around looking for alien “photons” to warp in so you can shoot them. You have to be quick though, they like to gang up and if to many get together there is the chance of a wormhole opening up and something nasty coming out..

Here are a few screen shots:

Nebulon 2009-06-02 22-34-26-59 Nebulon 2009-06-02 22-31-16-64 Nebulon 2009-06-02 22-32-36-56 Nebulon 2009-06-02 22-32-56-59 Nebulon 2009-06-02 22-33-21-60 Nebulon 2009-06-02 22-33-56-59

As you can see it can get pretty funky.

Here is a clip (pre play test drop):


If you have a Creators Club Premium account, please get on a give it a play test, we really would love to hear your feed back on it so we have a solid, robust game going into peer review.

You can leave your comments here, on the play test forum for Nebulon or on our blog.

So get your trigger fingers at the ready and start blasting some photons!

Monday, 18 May 2009

3D Modelling Tutorial Part 2 – 3DS Max

Following on from the basics in the previous post (which I had to split.  It was making this tutorial too large) we continue on to shape our box in to an airplane.

As a reminder and in case your scroll button is broken, along with page down and the down arrow buttons, I know mine usually feel like that sometimes after a pretty long document.  Usually from me hitting it with something hard, like my head. 

Here’s the objective in this tutorial.

 Tut2-Plane Finished

End result


Making the Wings

First off the Winds.  To make the wings of the airplane we are going to extrude the middle portions of the box, flatten them down and shift them back.

Now to work at the polygon level we need to change our selection criteria from object to polygon.  If you remember from the earlier post, we do this from the right hand command panel on the second tab.

image

  • With the object selected, click on the second tab in the command bar window.
  • Expand the “Edit Mesh” tree
  • Select the “Polygon” branch of the tree and you are in polygon selection mode

If the “Edit Mesh” branch is not there, then either you have not converted the object to a “Editable Mesh” or selected a different conversion option.  Read back to see if you have overlooked something

  • Next we select the polygons we are going to use for the wings, so select the box (our object) in the perspective view, go to the right hand command panel and select the second tab (modifier tab)
  • Expand the tree for the “Edit Mesh” item in the list and select polygon.
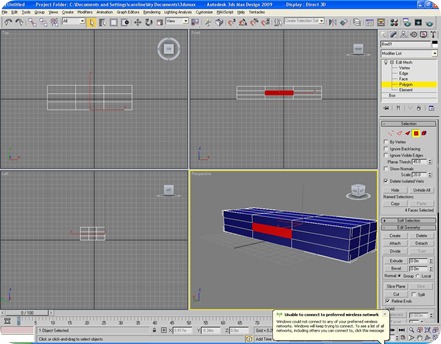
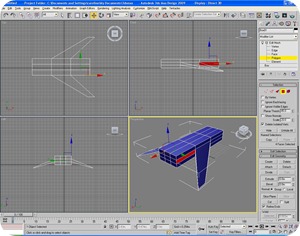
  • Now click on the square in the middle of the side of the box (as shown below), the polygon should change to RED to identify is has been selected.
6-Select Poly

Side middle polygon selected in perspective view.  Note side or front view could also have been used.

  • Now in the perspective view, hold down the ALT key, press the middle mouse button and rotate the view around so you can see the opposite side of the box
  • Release the mouse and ALT key’s
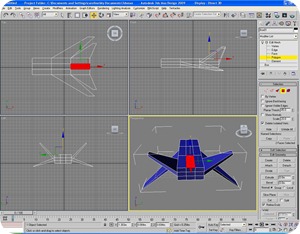
  • Now hold down the CTRL (Control) key and select using the left mouse button the same polygon on the side now in view (as shown below).  you should now have the same polygon selected on both sides of the box (rotate the view around to see both sides to be sure). 
Don’t use the right mouse click or select a polygon without using the CTRL key or you will deselect what were aiming for.


7-Select poly 2

Polygon also selected on other side of box.  Side or front view would not help selecting the back side.

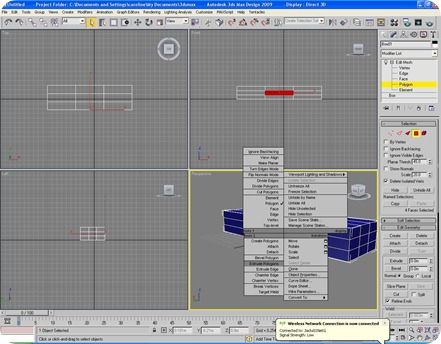
  • Now right click on the selected polygon in view and select the Extrude command.  you will notice the mouse icon will change to a stacked box icon when hovering over your selection now.

8-Extrude

Right click menu, note “extrude” command on right hand side of panel

  • To Extrude, hover mouse over selected area, hold the left button of the mouse and pull down.  you should get an effect the same as the picture below.  Extrude it until the wings are about the same width as the length of the plane.
*Note – Try also pulling back with the mouse when Extruding just to see the effect.  The polygons move inside the box instead of outwards.  Right click at any time while performing a command to undo any changes.


9-Post Extrude

After Extruding the wings

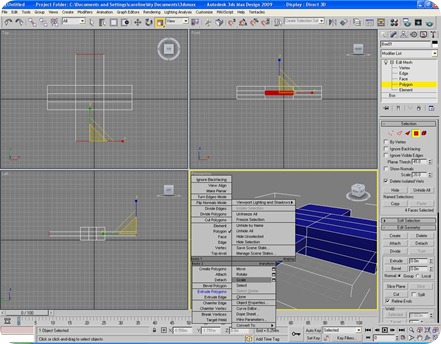
  • Now with the wing polygons still selected we need to switch to the Scale Command.  Like before right click in the selected area and select “Scale” from the right click menu.  The SCALE gizmo should appear on the selected area
10-Scale

Select the “scale” command

  • As before, hover the mouse of the selected area (note the icon has changed again, but only over the selected area).  Click on the Blue “Z” arrow of the GIZMO and this time pull down to scale in until the edges of the end of the wing meet up
  • Also then select the “X” arrow and narrow the wing tip slightly.  You are aiming for an effect as shown below.
11-Post Scale

Wing tips after scaling

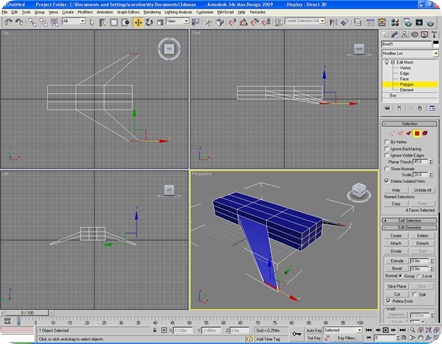
  • Lastly, still continuing with the wing tips selected, were going to move them to the back of the plane and down a bit.  For this we need to change to the Move command.  Again like before right click on the selection and click on the “Scale” command.
12-Move

Select the “move” command

  • Now if you grab the centre of the Move gizmo where both boxes highlight yellow and drag the wings back and down in the perspective view until they are just past the rear of the plane and dipping just below the bottom (as shown below).  Alternatively use the top and side views and do it in two stages (back then down).
I usually prefer the perspective view doing this kind of manoeuvre as it gives you the fluidity to see how your model shapes as you move.


13-Post Move

Wings in final position

  • With the wings done, it’s time to get on with the tail.  now this involves exactly the same operation as the wings but angling up instead of down. so:


14-Tail Wings Before Select the polygon in the middle rear of the plane and the same on the other side as with the wings


Extrude the tail wings out and then scale down to a point like with the wings.
Finally move then back and up this time until they are at the opposite angle of the wings
15-Tail Wings After
  • Then it’s on to the tail itself, again this is a similar approach
16-Tail Before We start off by selecting the centre polygon at the rear of the plane


Again like before, Extrude up, scale the top in, this time only moving the tail backwards so it the top is just overshooting the rear. 17-Tail After 
If you want to get more interesting, try having a split tail by using the two polygon’s to either side of the centre one instead of the centre.  Or even all three.  Experiment and see where it leads.


On to the Cockpit and nose

You will seem to notice a trend here in the way that the original body has been pulled and stretched to make the wings.  Now the nose may seem more of the same but you can always add simple variations.  These actions are the bread and butter of meddling so best to practice with them.  Anyway on with the show.

So far we have only been manipulating single polygons at a time, granted we have selected two at a time but we have done the same operations with them as one.  From here on we expand on that and also start manipulating edges to get the effects we want.

  • So to start we need to select the top nine polygons all at once.
18-Nose Before

The top polygons selected, not the bottom three.

  • Now similar to before we extrude out the front to about the same length as the polygons before it and then scale the nose in both on the Z and Y axis.
19-Nose After

End result with the nose cone

  • now we finally have something starting to look like a proper plane, but every plane needs a cockpit.
  • So start by selecting the centre most polygon behind the nose cone.
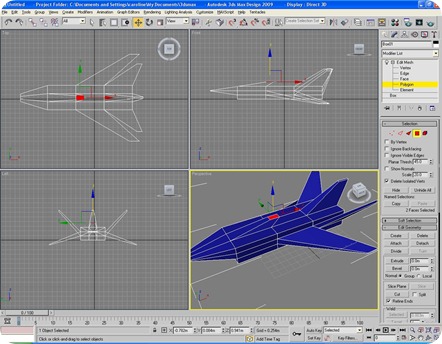
  • Like before, extrude up, scale it down and move it back so the rear edge of the polygon is just past the front of the wings.
20-Cockpit

The start of moulding the cockpit.

  • Now as it stands, it doesn’t look much like a cockpit, more like something poking out the aircraft, so here’s where we begin to mess with edges.
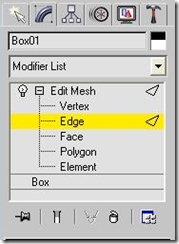
  • First begin by changing your selection mode from Polygon to Edge
  • With the object selected, click on the second tab in the command bar window.
  • Expand the “Edit Mesh” tree (if not so already)
  • Select the “Edge” branch of the tree and you are in edge selection mode
image

  • Now select the edge of the cockpit as shown below
  • Right click and change to Move mode
  • Then using only the Y arrow move the edge of the cockpit closer to the side of the plane.
image

1st Side of cockpit done

  • Then rinse and repeat for the other side of the cockpit

image

2nd Side of cockpit, try and get the two sides even

Unlike before, you cannot select the two edges and move them as one to get the effect, try it and see what happens.


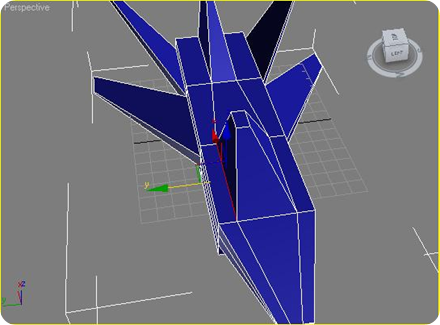
Onto the Engines

Now with the main body mostly done, it’s time to give our baby some juice and my that I mean some nice big engines.

  • First off, with any jet engine to push something out it needs to suck something in.  Not a great phrase but basically lets start with the engine intakes.  Since we are already at the front it make sense.
  • Angle the view down and up slightly so you get a view under the cockpit
  • Remember those 3 polygons we left alone earlier, they are going to become the intakes.
  • As we are still in edge selection mode, select the two middle edges one at a time and move them towards the centre as below.  This gives us two nice polygons for our intakes.
image

Start of intakes with edges moved inwards

  • Now switch back to polygon selection mode and select the two large polygons on the front.
  • Next we are going to use another command on the right click menu, “Bevel”.  Right click on the selected polygons and select “Bevel Polygons” in the menu.
image

“Bevel polygon” command highlighted on left side of menu

  • the Bevel command works the same as the Extrude command with one difference, it is a two step command.  So like when you created the box to begin with (drawing the shape first and then giving it depth), the bevel command performs two actions.  It is actually a combination of Extrude and Scale.
  • So now if you hover over the polygons you will see a new icon (not a gizmo), click and hold the mouse and drag it downwards.  You will see that you are now burrowing inside the plane.
  • Let go of the mouse when you think you are deep enough, but note that you are not jet finished, pull down on the mouse and notice that the hole you have just made is now narrowing.  Play with it until you are happy with the result.
image

End result.  Notice I have actually bevelled twice, second time a bit deeper to give a narrowing effect.


Lastly – The Engine

To finish off our plane we need an engine, one powerful enough to blast us in to outer space, or at least get us off the ground.

Nothing new here but a culmination of what you have used so far.

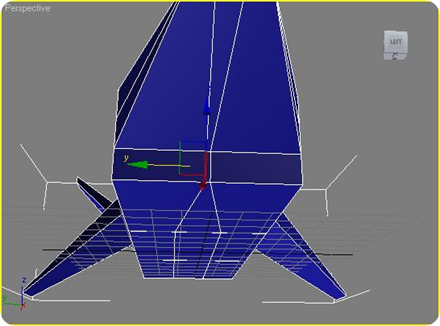
  • First rotate the perspective view around to look at the rear of the aircraft.
  • Fist off, we need a big engine and with the way the polygons are arranged at the moment, it’s just not big enough, so lets move the edges around to give us a bigger expanse to work with.
  • Use the command panel and get back into edge selection mode first.
image
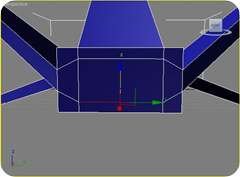
  • First move out the centre edges to the sides like so (moving the entire vertical line)
  • Next move the inner horizontal lines to create one big polygon in the centre.

Only move the inner edges this time else it will mess up the rear wings.

image

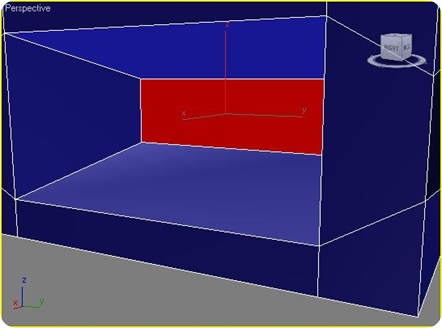
  • Now all that’s left is to carve inwards the Engine exhaust in the same way we did with the intakes using the Bevel command.
  • First change back to Polygon selection mode and select the centre polygon.
  • Then right click and select the “Bevel Polygon” command, left click on the selection and pull back, remembering when you let go of the mouse, you will perform the second part of the command to scale in and pull back again.
image

Engine exhaust bevelled inwards

  • Now to finish off the engine I added a little twist and reversed the last step and then bevelled outwards, to show a little of what can be done by mixing commands, so with the polygon still selected and the “Bevel” command still in action.
  • left click on the selected polygon and then push up (instead of down like before), let go of the mouse button and then pull back, to get something like below.
image

Engine final result


Conclusion

That’s if for now.  I’d suggest not stopping there and play around with this tutorial a bit to get a feel for the basics, even try starting with a cylinder primitive instead of a box to see what difference it makes to the outcome.

Remember, we have done all the above with only 1 primitive, we could have fashioned the wings, cockpit and such with multiple objects, but there is really no need when you can mould from something simple.

For extra credit though also try adding some weapons and missiles to the aircraft with other objects (starting with a cylinder first or a Cone) and moulding it to your needs.

Have fun and get ready for the next instalment in the series after I get the other half of this tutorial done in Blender.  Blender requires a little more work to get to this point but the important thing to remember is that the tricks are he same, just a different way of doing them.

Enjoy!