Following on from the basics in the previous post (which I had to split. It was making this tutorial too large) we continue on to shape our box in to an airplane.
As a reminder and in case your scroll button is broken, along with page down and the down arrow buttons, I know mine usually feel like that sometimes after a pretty long document. Usually from me hitting it with something hard, like my head.
Here’s the objective in this tutorial.
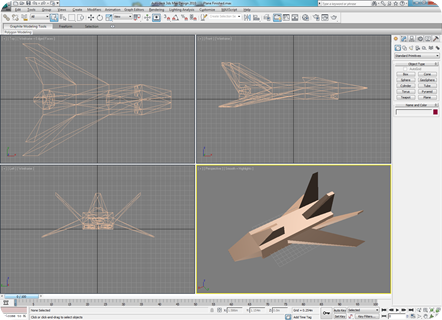 |
| End result |
Making the Wings
First off the Winds. To make the wings of the airplane we are going to extrude the middle portions of the box, flatten them down and shift them back.
Now to work at the polygon level we need to change our selection criteria from object to polygon. If you remember from the earlier post, we do this from the right hand command panel on the second tab.
If the “Edit Mesh” branch is not there, then either you have not converted the object to a “Editable Mesh” or selected a different conversion option. Read back to see if you have overlooked something |
- Next we select the polygons we are going to use for the wings, so select the box (our object) in the perspective view, go to the right hand command panel and select the second tab (modifier tab)
- Expand the tree for the “Edit Mesh” item in the list and select polygon.
- Now click on the square in the middle of the side of the box (as shown below), the polygon should change to RED to identify is has been selected.
 |
| Side middle polygon selected in perspective view. Note side or front view could also have been used. |
- Now in the perspective view, hold down the ALT key, press the middle mouse button and rotate the view around so you can see the opposite side of the box
- Release the mouse and ALT key’s
- Now hold down the CTRL (Control) key and select using the left mouse button the same polygon on the side now in view (as shown below). you should now have the same polygon selected on both sides of the box (rotate the view around to see both sides to be sure).
| Don’t use the right mouse click or select a polygon without using the CTRL key or you will deselect what were aiming for. |
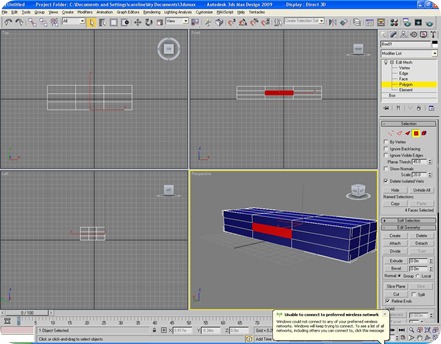 |
| Polygon also selected on other side of box. Side or front view would not help selecting the back side. |
- Now right click on the selected polygon in view and select the Extrude command. you will notice the mouse icon will change to a stacked box icon when hovering over your selection now.
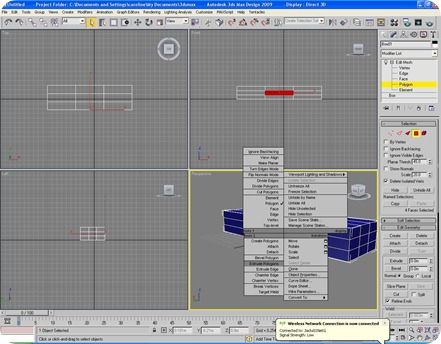 |
| Right click menu, note “extrude” command on right hand side of panel |
- To Extrude, hover mouse over selected area, hold the left button of the mouse and pull down. you should get an effect the same as the picture below. Extrude it until the wings are about the same width as the length of the plane.
| *Note – Try also pulling back with the mouse when Extruding just to see the effect. The polygons move inside the box instead of outwards. Right click at any time while performing a command to undo any changes. |
 |
| After Extruding the wings |
- Now with the wing polygons still selected we need to switch to the Scale Command. Like before right click in the selected area and select “Scale” from the right click menu. The SCALE gizmo should appear on the selected area
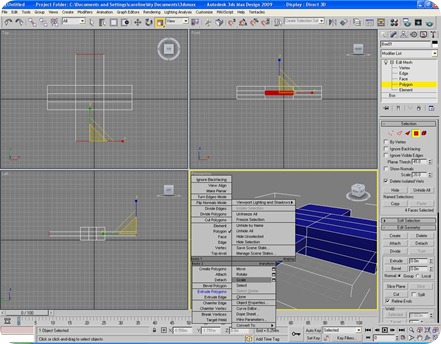 |
| Select the “scale” command |
- As before, hover the mouse of the selected area (note the icon has changed again, but only over the selected area). Click on the Blue “Z” arrow of the GIZMO and this time pull down to scale in until the edges of the end of the wing meet up
- Also then select the “X” arrow and narrow the wing tip slightly. You are aiming for an effect as shown below.
 |
| Wing tips after scaling |
- Lastly, still continuing with the wing tips selected, were going to move them to the back of the plane and down a bit. For this we need to change to the Move command. Again like before right click on the selection and click on the “Scale” command.
 |
| Select the “move” command |
- Now if you grab the centre of the Move gizmo where both boxes highlight yellow and drag the wings back and down in the perspective view until they are just past the rear of the plane and dipping just below the bottom (as shown below). Alternatively use the top and side views and do it in two stages (back then down).
| I usually prefer the perspective view doing this kind of manoeuvre as it gives you the fluidity to see how your model shapes as you move. |
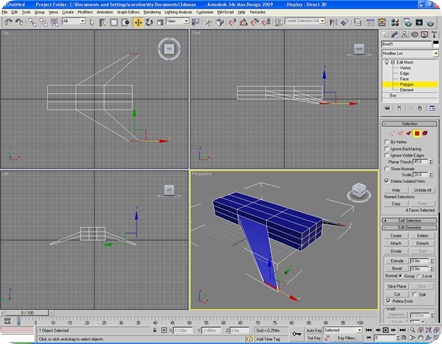 |
| Wings in final position |
- With the wings done, it’s time to get on with the tail. now this involves exactly the same operation as the wings but angling up instead of down. so:
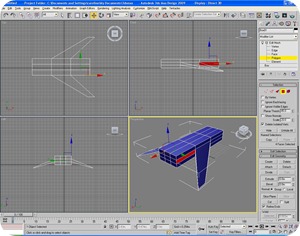 | Select the polygon in the middle rear of the plane and the same on the other side as with the wings |
| Extrude the tail wings out and then scale down to a point like with the wings. Finally move then back and up this time until they are at the opposite angle of the wings |  |
- Then it’s on to the tail itself, again this is a similar approach
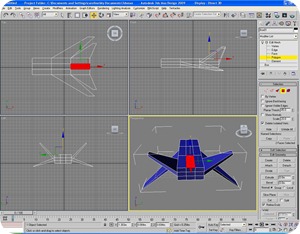 | We start off by selecting the centre polygon at the rear of the plane |
| Again like before, Extrude up, scale the top in, this time only moving the tail backwards so it the top is just overshooting the rear. |  |
| If you want to get more interesting, try having a split tail by using the two polygon’s to either side of the centre one instead of the centre. Or even all three. Experiment and see where it leads. |
On to the Cockpit and nose
You will seem to notice a trend here in the way that the original body has been pulled and stretched to make the wings. Now the nose may seem more of the same but you can always add simple variations. These actions are the bread and butter of meddling so best to practice with them. Anyway on with the show.
So far we have only been manipulating single polygons at a time, granted we have selected two at a time but we have done the same operations with them as one. From here on we expand on that and also start manipulating edges to get the effects we want.
- So to start we need to select the top nine polygons all at once.
 |
| The top polygons selected, not the bottom three. |
- Now similar to before we extrude out the front to about the same length as the polygons before it and then scale the nose in both on the Z and Y axis.
 |
| End result with the nose cone |
- now we finally have something starting to look like a proper plane, but every plane needs a cockpit.
- So start by selecting the centre most polygon behind the nose cone.
- Like before, extrude up, scale it down and move it back so the rear edge of the polygon is just past the front of the wings.
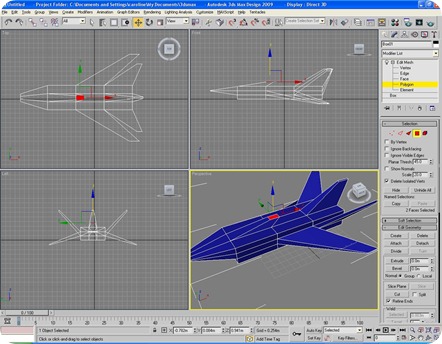 |
| The start of moulding the cockpit. |
- Now as it stands, it doesn’t look much like a cockpit, more like something poking out the aircraft, so here’s where we begin to mess with edges.
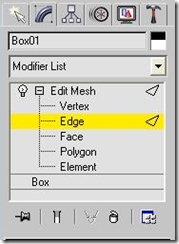
- First begin by changing your selection mode from Polygon to Edge
|  |
- Now select the edge of the cockpit as shown below
- Right click and change to Move mode
- Then using only the Y arrow move the edge of the cockpit closer to the side of the plane.
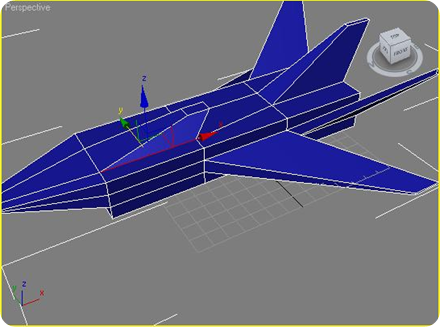 |
| 1st Side of cockpit done |
- Then rinse and repeat for the other side of the cockpit
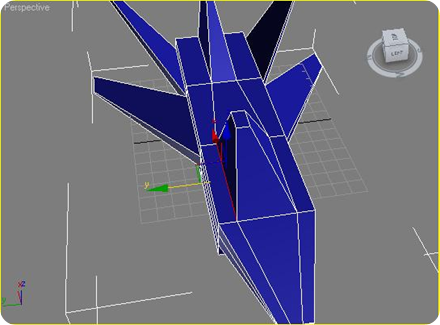 |
| 2nd Side of cockpit, try and get the two sides even |
| Unlike before, you cannot select the two edges and move them as one to get the effect, try it and see what happens. |
Onto the Engines
Now with the main body mostly done, it’s time to give our baby some juice and my that I mean some nice big engines.
- First off, with any jet engine to push something out it needs to suck something in. Not a great phrase but basically lets start with the engine intakes. Since we are already at the front it make sense.
- Angle the view down and up slightly so you get a view under the cockpit
- Remember those 3 polygons we left alone earlier, they are going to become the intakes.
- As we are still in edge selection mode, select the two middle edges one at a time and move them towards the centre as below. This gives us two nice polygons for our intakes.
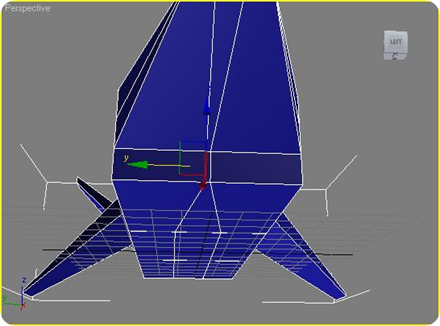 |
| Start of intakes with edges moved inwards |
- Now switch back to polygon selection mode and select the two large polygons on the front.
- Next we are going to use another command on the right click menu, “Bevel”. Right click on the selected polygons and select “Bevel Polygons” in the menu.
 |
| “Bevel polygon” command highlighted on left side of menu |
- the Bevel command works the same as the Extrude command with one difference, it is a two step command. So like when you created the box to begin with (drawing the shape first and then giving it depth), the bevel command performs two actions. It is actually a combination of Extrude and Scale.
- So now if you hover over the polygons you will see a new icon (not a gizmo), click and hold the mouse and drag it downwards. You will see that you are now burrowing inside the plane.
- Let go of the mouse when you think you are deep enough, but note that you are not jet finished, pull down on the mouse and notice that the hole you have just made is now narrowing. Play with it until you are happy with the result.
 |
| End result. Notice I have actually bevelled twice, second time a bit deeper to give a narrowing effect. |
Lastly – The Engine
To finish off our plane we need an engine, one powerful enough to blast us in to outer space, or at least get us off the ground.
Nothing new here but a culmination of what you have used so far.
- First rotate the perspective view around to look at the rear of the aircraft.
- Fist off, we need a big engine and with the way the polygons are arranged at the moment, it’s just not big enough, so lets move the edges around to give us a bigger expanse to work with.
- Use the command panel and get back into edge selection mode first.
 |
|
Only move the inner edges this time else it will mess up the rear wings. | 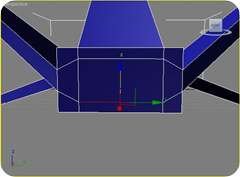 |
- Now all that’s left is to carve inwards the Engine exhaust in the same way we did with the intakes using the Bevel command.
- First change back to Polygon selection mode and select the centre polygon.
- Then right click and select the “Bevel Polygon” command, left click on the selection and pull back, remembering when you let go of the mouse, you will perform the second part of the command to scale in and pull back again.
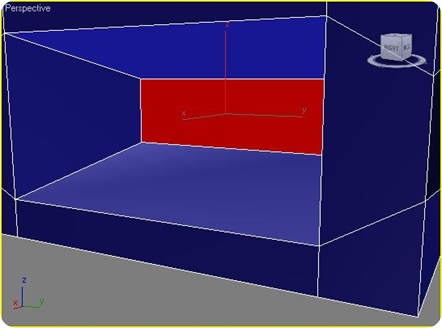 |
| Engine exhaust bevelled inwards |
- Now to finish off the engine I added a little twist and reversed the last step and then bevelled outwards, to show a little of what can be done by mixing commands, so with the polygon still selected and the “Bevel” command still in action.
- left click on the selected polygon and then push up (instead of down like before), let go of the mouse button and then pull back, to get something like below.
 |
| Engine final result |
Conclusion
That’s if for now. I’d suggest not stopping there and play around with this tutorial a bit to get a feel for the basics, even try starting with a cylinder primitive instead of a box to see what difference it makes to the outcome.
Remember, we have done all the above with only 1 primitive, we could have fashioned the wings, cockpit and such with multiple objects, but there is really no need when you can mould from something simple.
For extra credit though also try adding some weapons and missiles to the aircraft with other objects (starting with a cylinder first or a Cone) and moulding it to your needs.
Have fun and get ready for the next instalment in the series after I get the other half of this tutorial done in Blender. Blender requires a little more work to get to this point but the important thing to remember is that the tricks are he same, just a different way of doing them.
Enjoy!

No comments:
Post a Comment